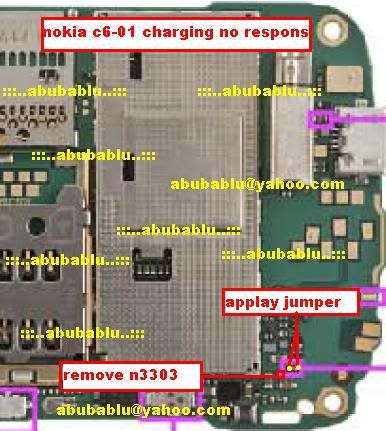


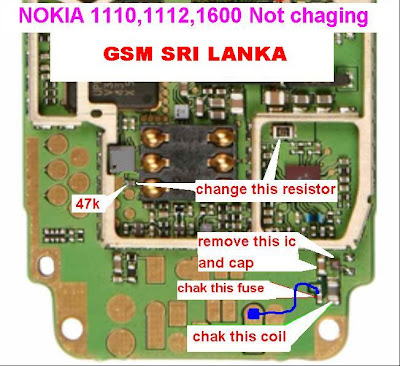
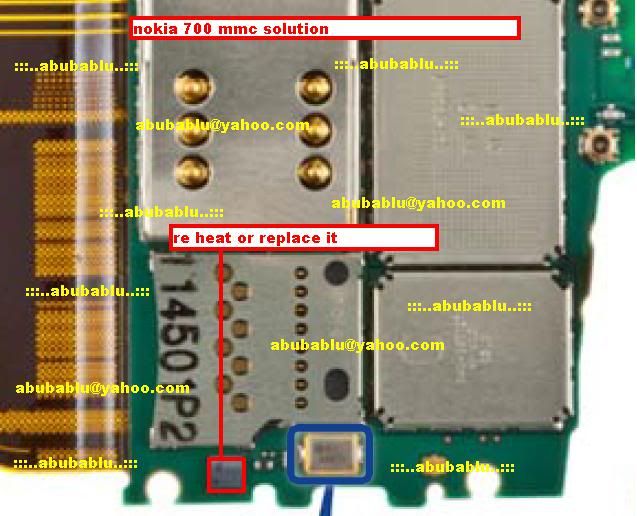
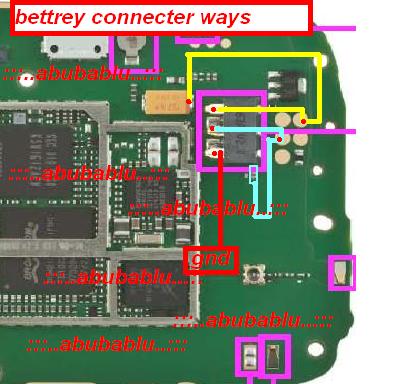
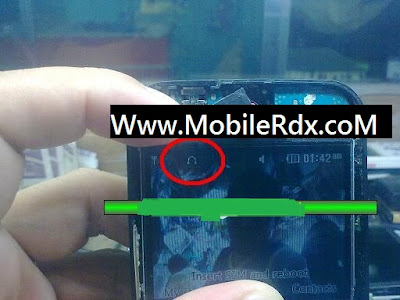
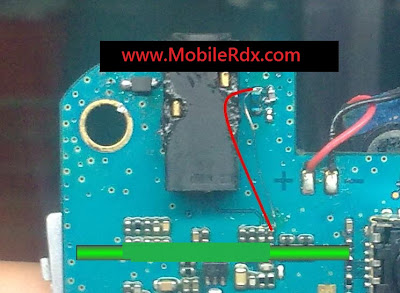
NOKIA 1110 not charging


| Mobile phone... Project ID: KABM5203B_CFORE_KXT_EN_1.01.C15###221 Changing baudrate to 921600... Done. Reading full Flash... Saved file to: |


 , then find and tap WALKMAN., then find and tap Movies......

Requirement:
- CWM Recovery
- 7zip, Winrar or any file compressing tool
- ADB setup in your PC
If your have ClockworkMod Touch Recovery 6.0.1.2 (Believe me it is easier and better in Touch recovery - Get it from here) follow these:-
- In CWM Recovery
- Reboot into Recovery => Hold Volume Up + Home + Power buttons together for about 5-7 seconds, release the buttons when you see the recovery menu
- Choose -> Backup and Restore
- Chooose -> Choose Backup Format (Optional)
- Change Backup format to tar (Optional)
- Choose -> Create image.zip
- This will create an image.zip and an image folder in your Internal Sdcard inside the clockworkmod>backup folder
- Copy the image.zip file to your PC, rename it to the software version you are sharing for e.g. GT-I9300-XXXXXXXX. Important do not put spaces in the name.
- Upload this zip to whichever Filehosting site you want to share with.
*this image.zip can be flashed in CWM directly without having the need to extract the files inside*
If you have ClockworkMod Recovery 5.5 (Get it from here) Follow these:-
- In CWM Recovery
- Reboot into Recovery => Hold Volume Up + Home + Power buttons together for about 5-7 seconds, release the buttons when you see the recovery menu
- Choose -> Backup and Restore
- Choose -> Backup (either Internal or External SDcard by default it will backup to ExtSDcar)
- Your Backup will now be there inside the clockworkmod>backup folder, Copy this folder to your PC
- Zip the Folder and give it a name for e.g. GT-I9300-XXXXXX (Dont use spaces)
- Now you can upload this zip to any filehosting service of your choice
I hope after reading this guide you will be able to share your backup effortlessly with any one.How to extract the modem:-
For extracting the modem you need to be rooted (If you are not or want to know how go here)
Using ADB (Go here if you want to know how to set up ADB)
- Connect your phone to you PC (Please ensure that ADB debugging option is checked in Developer Options)
- Type
Code:adb devicesYou will get something like this:Code:List of devices attached
XXXXXXXXXXXXXX deviceIt shows your device is connected via ADB- Type
Code:adb shellYou will get a output like this:Code:C:adb>adb shell
shell@android:/ $- Type
Code:suYou will get:Code:su
shell@android:/ #(Those who are using Terminal Emulator can start from this step)- Type
Code:dd if=/dev/block/mmcblk0p7 of=/sdcard/modem.bin bs=4096You will getCode:shell@android:/ # dd if=/dev/block/mmcblk0p7 of=/sdcard/modem.bin bs=4096
dd if=/dev/block/mmcblk0p7 of=/sdcard/modem.bin bs=4096
8192+0 records in
8192+0 records out
33554432 bytes transferred in 2.892 secs (11602500 bytes/sec)
shell@android:/ #- Your modem.bin file is copied to the root of your sdcard, copy it to your PC and upload it to the file hosting site of your choice


 .
.


