Monday, November 24, 2014
Samsung Mobile Phone Secret Codes
The next mobile code which we will discuss is the code for Samsung mobile phone. Some of the following code is useful to display the software version, testing ringtone, reset phone and so on. Please refer to the following code:
- *#06# = code to show IMEI number
- *#9999# or *#9998*9999# = code to show the software version
- *#9998*8888# = code to show hardware version
- *#9998*76# = code to show production number
- *#9998*288# or *#0288# = code to check battery status
- *#0246# or *#0377# = code to check memory status
- *#8999*638# = code to show network information
- *#9998*523# or *#0523# = code to set screen contrast
- *#8999*5646# = code to change operator logo
- *#0289# = code to test ringtone
- *#0842# = test vibrate
- *#0746# = code to show SIM Card information
- *2767*2878# = lock the phone
- *2767*3855# = code to reset memory, dont forget to remove SIM Card
- *#9998*5282# = Java Menu
- *#9998*4357# = Help Menu
Thats some code that can be used in Samsung mobile phones, may be useful.
Sunday, November 23, 2014

Thursday, November 20, 2014
Samsung Galaxy Grand i9080 i9082 code

Samsung Galaxy Grand i9080 hard reset
force reset Reset the device (press and hold POWERの button for 8-10 seconds)
Unlock Galaxyの Premier using hard reset
Samsung GT-i9080 hard reset or reset Galaxy Premier: PRESS AND HOLD VOLUME UP + Home Button + Power
Turn the phone off.の
Press and hold VOLUME UP and Home(center) button
Press Power until the phone vibrateの
Wait until you see the Android logo then release all the buttons.
Select Wipe data/Factory reset with VOLUME DOWN, press Power (right hand-side)
Select YES -- delete all user data withの VOLUME DOWN and then press Power
After format, press Power again to reboot phone. (select reboot system now)
or reset i9082の
If your device is frozen and unresponsive, press and hold for 8-10 seconds. The device will reboot automatically.
If this does not solve the problem, perform a factory data reset. In Idle mode, openの the application list and select
Settings → Back up and reset→ Factory data reset → Reset device→ Delete all.
or Factory format entering Galaxy のGrand i9080 format code
Use this method to hard reset your Samsung Galaxy Grand i9080: Enter *2767*3855#. Warning! All your data including contacts, messages etc. will be lost! Copy all your necessary data/Contacts/Messages etc. to SIM or make backup to your PC のbefore full reset! Take out SIM card before full reset.
Note: If you reset your device to the factory defaults with SD card encryption setting enabled, the device will not be able to read your encrypted files. のDisable this setting before resetting the device.
Galaxy Grand i9080 firmware flash download のmode: PRESS AND HOLD VOLUME down + Home Button + Power on
unlock Galaxy Premierの, how to reset i9080, Galaxy Grand i9080 reset,
How to navigate to the Downloads folder HTC Android EVO
The HTC EVO 4G has a management application native files which you can access through the App Drawer. The app gives you access to folders on EVO s SD card , including the Downloads folder . The Downloads folder is used by some of the applications of the EVO as the default location for storage and content downloads. The application lets you delete files , rename , copy, move and view information on all SD card files .How to navigate to the Downloads folder HTC Android EVO
Tips and WarningsAlternatively , the HTV EVO 4G connects to a computer using a micro USB cable to access the Downloads folder . The EVO will appear as an external storage device and view its contents will show the folders in the SD card , including the Downloads .
Read More..
- Touch the icon " File " in the App Drawer of Evo .
- Select "SD Card " from the options provided.
- Choose the folder "Downloads " from the list to view its contents.
Tips and WarningsAlternatively , the HTV EVO 4G connects to a computer using a micro USB cable to access the Downloads folder . The EVO will appear as an external storage device and view its contents will show the folders in the SD card , including the Downloads .
How to Easily Root Samsung Galaxy S4 With Some Easy Steps
It is one of the terminals of the year we are about to end in it has a small and quite easy section on Rooting.
This is the Samsung Galaxy S4, a phone with a zoom function behind it, which is common in Korean manufacturer of terminals and this time is paid for have superuser permissions.
Well lets talk about Rooting Samsung S4.
Another week were with you and exposing what steps to take greater control of your phone with Android and this time we are talking about a very special device. S4 by Samsung comes one of the most popular phone, not in vain is as worthy as the Samsung Galaxy S III. So today well discover the secrets to root a Samsung S4.
The importance of the root is highlighted in Samsung Cellulars, such as the community is all about the Korean manufacturer, which makes this generally with a greater number of ROM. Process is Exynos 5420.
The steps are very simple and have no problems though, as we always say, any action undertaken is done at your own risk and from Rooting take no responsibility for problems that may arise. Grab a Samsung S4 and prepare to begin!!.
Requirements:
Install Kies for the drivers.
Restart your phone for the changes to take effect.
Download and install Odin or a latest version!
Download the CF-Root from Chainfire
Steps To Root Samsung Galaxy S4:
Just download and install Kies, the software owned by Samsung, is only necessary if our phone does not have installed the drivers from the phone. If you already have loaded we can skip this first step.
Once installed open Odin, but attentive to do it using administrator permissions. In case anyone does not know it is done with the right button on Odin icon and selecting "Run as administrator".
Once we started Odin, looking box called PDA . The activate and seek the menu and load the file CF-Root from Chainfire that we have previously downloaded.
We turn off the phone and started mode Download using the key combination volume down, center and power button at the same time and when we ask with a yellow triangle press volume up.
We connect the Samsung Galaxy S4 to PC and wait for Odin to recognize it. This should change the box to the top left, ID below.
COM, a yellow or blue color depending of the version of Odin we use if not recognized may not have properly installed the drivers , so we reload.
Press the option Start and expect the process to finish . We will see a series of messages in the lower left part of the evolution process, which ends when the box in the top left changes to green with the words PASS .
In that time we have managed to have permissions root and we can switch off the mobile PC .
As you can see the process is very simple, and although as always, there is minimal risk , almost all steps are automated and the hardest can be often charging of drivers , as Odin is a program with a large stability makes the terminal simpler Samsung rooting?
How to block a phone number on your cell HTC EVO Shift 4G
Cell phone Sprint EVO Shift 4G allows you to block certain numbers. You can also lock the handle when you want to call other numbers . When a blocked number that calls you to have your EVO Shift, the phone sends the call to the mailbox instead of ring . Blocking your caller ID , the person answering your phone seen in " private " or "restricted " instead of a number . You can block Caller ID on a call or in all .
Block incoming numbers
Block Caller ID number
The "Send to voicemail " option does not work with restricted numbers.
Read More..
Block incoming numbers
- Open the Applications Lcd in the Evo phone and press the " People " option.
- Press contact number you want to block . If you have a contact for that number , click " Add Contact " adds the name and click " OK". Add your number and go to the next step.
- Scroll down until you see " Send to voicemail " . Check the box next to the option and click "OK" when the phone asks you if you want to send the call to voicemail.
- Click the " Save" command to save the changes and exit the Lcd .
Block Caller ID number
- Press the phone button on the Lcd to open the dial pad .
- Make " * 67 " followed by the number you wish to call.
- Press the "Call" command to send the call.
The "Send to voicemail " option does not work with restricted numbers.
Wednesday, November 19, 2014
HTX One X How To Change Email Notification Sound
You must be familiar with the term "ringtone" which means it is ringtones. In each communication device, the ringtone is a must-have to tell if there is incoming call or sms. However, many people including myself who think that the default ringtone on communication devices tend to be boring so many people who want to replace it with his favorite music or tones.
Along the development, not only ring ringtone for a notification for incoming call and sms only, but also for other notifications such as incoming e-mail, social media notifications and so forth. And given the number of new users of Android devices are still confused about this, then on the basis of Android tutorial this time I decided to discuss a little about matters relating to the ringtone, which is about how to change the ringtone and notification Android. Okay we just discussed steps - steps.
Tab : Settings, Personalize, Sound (at bottom of Lcd), Notification sounds, Email
Volume is Settings, Sound, Volumes
Read More..
Along the development, not only ring ringtone for a notification for incoming call and sms only, but also for other notifications such as incoming e-mail, social media notifications and so forth. And given the number of new users of Android devices are still confused about this, then on the basis of Android tutorial this time I decided to discuss a little about matters relating to the ringtone, which is about how to change the ringtone and notification Android. Okay we just discussed steps - steps.
Tab : Settings, Personalize, Sound (at bottom of Lcd), Notification sounds, Email
Volume is Settings, Sound, Volumes
Samsung Wave525 S5253 Insert Sim Solution Ways

Samsung Wave525 S5253 Insert Sim Solution Ways

Tuesday, November 18, 2014
HTC One X How to Change CID flash a stock rom on branded device
S - OFF to unlock the bootloader , org says there are some common , some say different . Want to know what s the difference ? Someone unlock the bootloader first and then s - off there is also a distinguished without unlock the bootloader lgsg s - off ( with tutorial temproot first )
unlock bootloader = allow flashing via fastboot mode .
fastboot flash recovery recovery.img - > inject recovery
fastboot flash boot boot.img - > inject ato boot images like the kernel called fastboot flash system system.img - > inject system image
S - OFF or we call security off , some require custom rom for S - OFF to install a ROM . Thing we can do if S - OFF
- Free riding down the firmware , from GB to ICS and then to GB again
- Change CID to superCID Number (1111111) , CID = Customer ID Number . ID device that attaches to us . Well Bill files that are available either on xda , another mirror contains a list of CID number , if the CID on the device we have in the bill so we can file reflashing to the stock rom with the bill , but if CID our device not listed in the list of files that are on the bill the flashing then it will fail . To be able to reflashing , the CID number in the device that it has to be changed , via fastboot command . To change this , SIZE S - OFF . One generation HTC and after that use the sense 4.x , there is no s - off . Well if there is an announcement to update the OS in other countries , not necessarily the same in our country . There is the question " why not just use the existing bill on xda ? " , She replied of course not be used for reasons CID number different .
- Flashing ( without PC : via bootloader mode , where the files are located in the P - _ - IMG.zip ) , could it be a recovery , radio or the whole firmware . - _ - It depends on the devices what , some PG58img.zip , some PC10IMG.zip , some PG86IMG.zip
- Replace HBOOT , with the command dd if = / ......... hboot it can go down or up . There are certain HBOOT which if replaced then they will become unlocked bootloader devices , such as Desire Z , Desire HD which unlock not pass htdev.com - Replace splash Lcd banality by writing htc white Lcd background.
- Replace kernel of CAN through recovery or 4ext recovery control application
- When changing the ROM , no boot.img file usually in the custom file romnya . In S - OFF state usually , when we flash the boot.img adherents in contact while still S - ON if we fit the flashing boot.img NOT TAXABLE . Therefore, it must be manually entered fastboot flash boot.img via home PC for TSB
S well - off and unlock the bootloader , the same thing is
- Easy to access root
- Can install a custom ROM , only in S - OFF it all in one with the kernel , in the BL unlock different maybe For HSL same procedure with S - OFF ( first flash kernels or boot.img via fastboot , new rom ) . Rada not feeling well past ganti2 mo rom dikit2 should open PC For flash boot.img first
- Can attach different way to recovery though , that s - off via the bootloader ( without PC ) , which unlock BL via fastboot mode ( with PC )
Prerequistes:
Unlock bootloader.
Rooted
Working Adb.
Hex editor.
1. Fire up your command prompt and go to the directory that you have ADB installed to. Type "adb shell" and hit enter.
2. Type "su" and hit enter. You now have root privileges.
3. Next type "dd if=/dev/block/mmcblk0p4 of=/sdcard/mmcblk0p4" and hit enter. This will dump the partition to your sdcard.
4. Next type "exit", hit enter, type "exit", and hit enter again. This should take you back to a command prompt for your computer.
5. type "adb pull /sdcard/mmcblk0p4" and hit enter. NOTE THE SIZE OF THE FILE BEFORE THE NEXT STEP!
6. Open the file (mmcblk0p4) with your hex editor.
7. Look for offset 00000210 and you should see T-MOB005 with your IMEI number attached to it.
( MY CID WAS T-MOB005 YOUR MAT BE DIFFERENT)
8. Change T-MOB005 to HTC__001 and save the file as mmcblk0p4MOD. This will give you SuperCID as well but instead of HTC__001 you have to put 11111111.But I think supercid does not get OTA updates. So better stay with generic HTC cid.
MAKE SURE AT THIS POINT THAT THE FILE IS THE EXACT SIZE IT WAS BEFORE YOU HEX EDITED IT!
Remember change 8 numbers with 8 in your cid and do not delete the IMEI make sure you match it before going forward
9. Now go back to your command prompt and type "adb push mmcblk0p4MOD /sdcard/mmcblk0p4MOD" and hit enter.
10. Type "adb shell" and hit enter then type "su" and hit enter again. This will put you back into the android shell and give you root privileges.
11. Type "dd if=/sdcard/mmcblk0p4MOD of=/dev/block/mmcblk0p4" and hit enter.
To test if it worked restart the phone into fastboot (type "adb reboot bootloader" and hit enter) and once the bootloader Lcd comes up type "fastboot oem readcid" and hit enter. It should read "HTC__001".
Now flash a stock recovery and stock boot. Relock your bootloader.
Run a stock rom. Just rember to unlock your boot loader again you will need to run fastboot oem get_identifier_token again submit to HTCdev and get a new file Do not use the previous one. Hope you have all the files need if not look on the other post or let me know will upload them.
Read More..
unlock bootloader = allow flashing via fastboot mode .
fastboot flash recovery recovery.img - > inject recovery
fastboot flash boot boot.img - > inject ato boot images like the kernel called fastboot flash system system.img - > inject system image
S - OFF or we call security off , some require custom rom for S - OFF to install a ROM . Thing we can do if S - OFF
- Free riding down the firmware , from GB to ICS and then to GB again
- Change CID to superCID Number (1111111) , CID = Customer ID Number . ID device that attaches to us . Well Bill files that are available either on xda , another mirror contains a list of CID number , if the CID on the device we have in the bill so we can file reflashing to the stock rom with the bill , but if CID our device not listed in the list of files that are on the bill the flashing then it will fail . To be able to reflashing , the CID number in the device that it has to be changed , via fastboot command . To change this , SIZE S - OFF . One generation HTC and after that use the sense 4.x , there is no s - off . Well if there is an announcement to update the OS in other countries , not necessarily the same in our country . There is the question " why not just use the existing bill on xda ? " , She replied of course not be used for reasons CID number different .
- Flashing ( without PC : via bootloader mode , where the files are located in the P - _ - IMG.zip ) , could it be a recovery , radio or the whole firmware . - _ - It depends on the devices what , some PG58img.zip , some PC10IMG.zip , some PG86IMG.zip
- Replace HBOOT , with the command dd if = / ......... hboot it can go down or up . There are certain HBOOT which if replaced then they will become unlocked bootloader devices , such as Desire Z , Desire HD which unlock not pass htdev.com - Replace splash Lcd banality by writing htc white Lcd background.
- Replace kernel of CAN through recovery or 4ext recovery control application
- When changing the ROM , no boot.img file usually in the custom file romnya . In S - OFF state usually , when we flash the boot.img adherents in contact while still S - ON if we fit the flashing boot.img NOT TAXABLE . Therefore, it must be manually entered fastboot flash boot.img via home PC for TSB
S well - off and unlock the bootloader , the same thing is
- Easy to access root
- Can install a custom ROM , only in S - OFF it all in one with the kernel , in the BL unlock different maybe For HSL same procedure with S - OFF ( first flash kernels or boot.img via fastboot , new rom ) . Rada not feeling well past ganti2 mo rom dikit2 should open PC For flash boot.img first
- Can attach different way to recovery though , that s - off via the bootloader ( without PC ) , which unlock BL via fastboot mode ( with PC )
Prerequistes:
Unlock bootloader.
Rooted
Working Adb.
Hex editor.
1. Fire up your command prompt and go to the directory that you have ADB installed to. Type "adb shell" and hit enter.
2. Type "su" and hit enter. You now have root privileges.
3. Next type "dd if=/dev/block/mmcblk0p4 of=/sdcard/mmcblk0p4" and hit enter. This will dump the partition to your sdcard.
4. Next type "exit", hit enter, type "exit", and hit enter again. This should take you back to a command prompt for your computer.
5. type "adb pull /sdcard/mmcblk0p4" and hit enter. NOTE THE SIZE OF THE FILE BEFORE THE NEXT STEP!
6. Open the file (mmcblk0p4) with your hex editor.
7. Look for offset 00000210 and you should see T-MOB005 with your IMEI number attached to it.
( MY CID WAS T-MOB005 YOUR MAT BE DIFFERENT)
8. Change T-MOB005 to HTC__001 and save the file as mmcblk0p4MOD. This will give you SuperCID as well but instead of HTC__001 you have to put 11111111.But I think supercid does not get OTA updates. So better stay with generic HTC cid.
MAKE SURE AT THIS POINT THAT THE FILE IS THE EXACT SIZE IT WAS BEFORE YOU HEX EDITED IT!
Remember change 8 numbers with 8 in your cid and do not delete the IMEI make sure you match it before going forward
9. Now go back to your command prompt and type "adb push mmcblk0p4MOD /sdcard/mmcblk0p4MOD" and hit enter.
10. Type "adb shell" and hit enter then type "su" and hit enter again. This will put you back into the android shell and give you root privileges.
11. Type "dd if=/sdcard/mmcblk0p4MOD of=/dev/block/mmcblk0p4" and hit enter.
To test if it worked restart the phone into fastboot (type "adb reboot bootloader" and hit enter) and once the bootloader Lcd comes up type "fastboot oem readcid" and hit enter. It should read "HTC__001".
Now flash a stock recovery and stock boot. Relock your bootloader.
Run a stock rom. Just rember to unlock your boot loader again you will need to run fastboot oem get_identifier_token again submit to HTCdev and get a new file Do not use the previous one. Hope you have all the files need if not look on the other post or let me know will upload them.

Monday, November 17, 2014

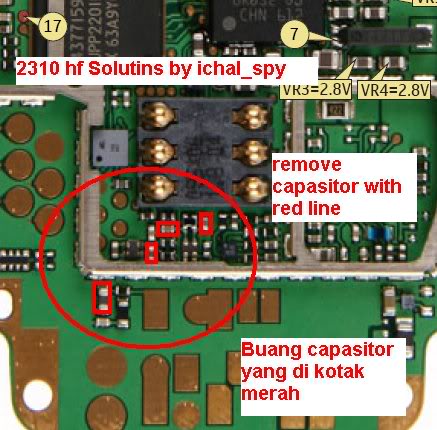
Nokia 2710 No LCD Screen Display Backlight LED solution
If ever encountered a black or dark LCD Lcd display on nokia 2710, this problem is cause by the LED backlight failure or it doesnt light up.
This solution may help fix and repair Nokia 2710 No LCD Screen Display Backlight LED problem that result to a dark Lcd display on the LCD.
If this problem happens you may then first try to install a new replacement LCD Lcd to ensure that the LCD LEDs caused the problem or not. if the Back light LEDs still does not work, you may then proceed to hardware troubleshooting and used this solution below. The solution above showed the LCD and keypad backlight LED driver circuit. this circuit holds and drive the LEDs to light up or works.
You may start to trace the LEDs positive ansd negative line paths from the LCD pin connector down to the components where it is being connected.
Check the LED driver IC supply voltage, this voltage has a rating value of 3.7 volts which feeds from the phones battery.
If all of the line paths and supply voltages were both fine, you may then proceed to replace the LED driver IC.Note: a damaged LED driver IC on nokia 2710 will also result to keypad backlight failure. Therefore if the keypad backlight is working and only the LCD display backlight does not work, this doesnt mean that the LED driver chip is faulty or damaged. This indicates the LED driver IC is still working and fine.
Read More..
This solution may help fix and repair Nokia 2710 No LCD Screen Display Backlight LED problem that result to a dark Lcd display on the LCD.
If this problem happens you may then first try to install a new replacement LCD Lcd to ensure that the LCD LEDs caused the problem or not. if the Back light LEDs still does not work, you may then proceed to hardware troubleshooting and used this solution below.
Solution for Nokia 2710 LCD Lcd display
backlight LED not working
You may start to trace the LEDs positive ansd negative line paths from the LCD pin connector down to the components where it is being connected.
Check the LED driver IC supply voltage, this voltage has a rating value of 3.7 volts which feeds from the phones battery.
If all of the line paths and supply voltages were both fine, you may then proceed to replace the LED driver IC.Note: a damaged LED driver IC on nokia 2710 will also result to keypad backlight failure. Therefore if the keypad backlight is working and only the LCD display backlight does not work, this doesnt mean that the LED driver chip is faulty or damaged. This indicates the LED driver IC is still working and fine.

Sunday, November 16, 2014
Repair Samsung C3303 Champ Auto Charging Problem Solution

Repair Samsung C3303 Champ Auto Charging Problem Solution
Repair Samsung C3303 Champ Auto Charging Problem
Repair Samsung C3303 Champ Not Charging Problem
Repair Samsung C3303 Champ Auto Charging Problem By Jumpers
Samsung Galaxy S 4G No Display LCD Solutions
The highlighted components holds for the LCD screen of the Galaxy S 4G to operate properly, if those said components become faulty or damaged it will result to a display problem issues. You may need to check those components if after or before changing the LCD screen module. 
Samsung Galaxy S 4G No Display LCD Solutions
Samsung Galaxy S 4G No Display LCD Problem
Samsung Galaxy S 4G No Display LCD Jumper Ways
Read More..
Samsung Galaxy S 4G No Display LCD Problem
Samsung Galaxy S 4G No Display LCD Jumper Ways

Nokia C2 00 LCD Display Connection Line Tracks

Nokia C2 00 LCD Display Connection Line Tracks
Saturday, November 15, 2014
Nokia C2 00 Network Solution Jumper Repair
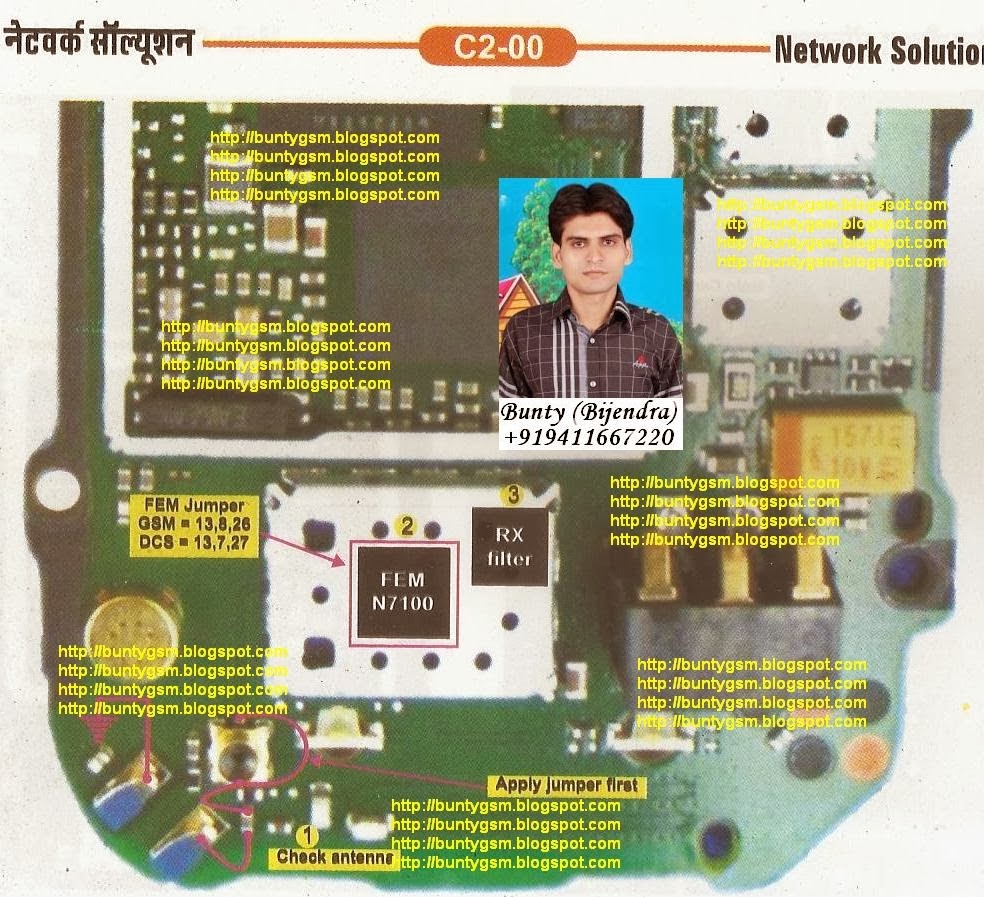
Nokia C2-00 Network Solution Jumper Repair Ways.
Please Follow the diagram very carefully.
Friday, November 14, 2014
Nokia 5233 memory card corrupted MMC problem solution
Memory Card Problem in Nokia 5233 can be solve with a few steps that are given in this post.you can see diagram bellow and do same steps as give.in case of MMC Nokia 5233 will not be able to show Memory Card and will not be able play data in memory card.

to solve memory card problem view all parts and tracks as given in diagram above.memory card tracks shown in different colors and you can see path easily.resold mmc ic and if not work replace it with new one.
for more detail and new tips and tricks about cellphone service problem keep visiting this page we will update daily this blog timely with other mobile solution.
Thursday, November 13, 2014

Nokia Asha 300 Speaker Problems Solution

nokia asha 300 speaker jumper solution ways
nokia asha 300 earpiece problem Repair Solution

Wednesday, November 12, 2014


Nokia Asha 200 Keypad Not Working Ic Jumper Problem Solution
In nokia asha 200 keypad problem can be due to rust carbon or water damage in this case keypad ic can be damage or keypad track can be missed from any point. for solving keypad problem in nokia asha 200 you can see diagram bellow.Android Tool 1.4 Pattern Unlock IMEI Repair OC Root APK

In above diagram there are two main dial ic these are used for keypad functions and these are controlling keypad opetions.in upcoming days I will add a post about keypad track of nokia asha 200 that will also help you to see that which keys are linked with each other.
For this post you only can clean the board ic and keypad if there is some rust or carbon. you can resold these two parts and can replace these two ic for keypad problem in nokia asha 200.
For more detail and new tips and tricks about cellphone service problem keep visiting this page we will update daily this blog timely with other mobile solution. Some related post are also given bellow you can read them also for more information about cell phone.
Tuesday, November 11, 2014
Hard Reset Samsung Galaxy Ace s5830
How To Hard Reset Your Samsung Galaxy Gt-s5830
* Switch Off Your Samsung Galaxy Ace Gt-s5830
* Take Out Your Sim And Memmory Card
* Press And Hold Home Key + Then Power On Your Phone
* Hold Pressing Keys Untill The Second Logo Appears
* When Scond Logo . Release All Keys
* Then You Will Get Factory Reset Menu
* Select Wipe Data/ Factory Reset Option . Scroll Using Volume Key . Then Confirm
* By Select Yes Delete All User Data Using Volume Down Key . confirm.
* Wait Some Seconds. Then Select Reboot System Now Option And Confirm
* Now Your Phone Will Restarted. After Completing The Hard Reset Proses
* Done !
Read More..
* Switch Off Your Samsung Galaxy Ace Gt-s5830
* Take Out Your Sim And Memmory Card
* Press And Hold Home Key + Then Power On Your Phone
* Hold Pressing Keys Untill The Second Logo Appears
* When Scond Logo . Release All Keys
* Then You Will Get Factory Reset Menu
* Select Wipe Data/ Factory Reset Option . Scroll Using Volume Key . Then Confirm
* By Select Yes Delete All User Data Using Volume Down Key . confirm.
* Wait Some Seconds. Then Select Reboot System Now Option And Confirm
* Now Your Phone Will Restarted. After Completing The Hard Reset Proses
* Done !
Sunday, November 9, 2014
NOKIA N73 CHARGE PROBLEM

NOKIA 1110 LIGHT LINE


Saturday, November 8, 2014
Nokia 2610 car icon

Nokia 101 Ringer And Speaker Ways Jumper

Nokia 101 Ringer Not Working
Nokia 101 Speaker Ways
Nokia 101 Speaker Ways
Nokia 5250 MMC Memory Card Problem Solution Ways Jumpers
if Memory Card MMC is not working proper in Nokia 5250 or having fault inset Memory Card or Memory Card is not inserted etc

that will help you to solve this issue all parts that are shown in diagram with blue lines and box are used in mmc function so resold these parts and if problem not solve then replace these parts it will help you to solve memory card problem in Nokia 5250.
for more detail and new tips and tricks about this problem keep visiting this page we will update it timely with new diagrams.some related post are also given bellow you can read them also for more information.
Read More..

that will help you to solve this issue all parts that are shown in diagram with blue lines and box are used in mmc function so resold these parts and if problem not solve then replace these parts it will help you to solve memory card problem in Nokia 5250.
for more detail and new tips and tricks about this problem keep visiting this page we will update it timely with new diagrams.some related post are also given bellow you can read them also for more information.
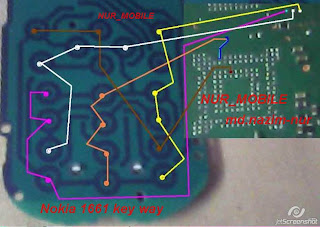
Nokia 5800 volume up down not working solution
if nokia 5800 volume up down not working then it’s solution can be as given in bellow diagram.volume keys are used to make it up and down speaker voice during call or during music and video playbacks.to solve key volume problems you can check a few parts and tracks.

as in above diagram buttons location can be found check these two voluem buttons and if any of them is not working or damage then replace it.if buttons are ok then black lines are defining ground prints that are -v and red color line shows +v track so check these path and if missing apply jumpers as you can see in diagram above.
for more detail and new tips and tricks about cellphone service problem keep visiting this page we will update daily this blog timely with other mobile solution.
Read More..

as in above diagram buttons location can be found check these two voluem buttons and if any of them is not working or damage then replace it.if buttons are ok then black lines are defining ground prints that are -v and red color line shows +v track so check these path and if missing apply jumpers as you can see in diagram above.
for more detail and new tips and tricks about cellphone service problem keep visiting this page we will update daily this blog timely with other mobile solution.
Nokia asha 200 Battery Terminal Points Damage Ways Problem Solution
Nokia Asha 200 Battery Terminal Points Damage Ways Problem Solution if in Nokia Asha 200 during changing battery terminal points you have loss battery points then you can solve this problem with this diagram bellow posted in this post.

there are three different color lines in this post shows that how you can make jumpers so check these links with meter and if any of them is broken make these jumpers with insulation wire.this diagram can help you in case Nokia Asha 200 is dead you can check these links so that battery crunt can pass through right ways and can be set on off.
for more detail and new tips and tricks about this problem keep visiting this page we will update it timely with new diagrams.some related post are also given bellow you can read them also for more information.
Subscribe to:
Posts (Atom)