Monday, October 27, 2014
Nokia 2710 Mic mouthpiece microphone problem solution
This solution simply shows the location of the components where you may to have a check or replace if found damaged. In Nokia 2710ne, the cell phone microphone is installed or mounted on the bottom side of the PCB board, and also all of its corresponding circuit components such as the filter coils or surface mount inductors, chip resistors and chip capacitor were also mounted near to it.

Sunday, October 26, 2014
How to Root samsung Galaxy Note 2 N7100

The pre requisites you will have to follow this guide are:
- This rooting process is and work only for Samsung Galaxy Note 2 international version, model number N7100. For checking the model number follows the next path: “Settings > About Phone”.
- After the device is rooted you’ll lose the warranty for your device, for get back your warranty is to re applying with the official firmware update, firmware that you currently have it.
- For saving your SMS, please use “SMS Backup & Restore app”.
- For saving your Contacts, please use “Sync with the Gmail application”.
- For saving your stored Call Log, please use Call Log and Restore.
- For saving your Images files, Songs and Videos files, and other important Files please Copy to internal / External SD Card.
- For APN and MMS Settings, you can note down from the path “Applications > Settings > Wireless and Network > Mobile Networks > Access Point Names”
We recommend turning off your antivirus protection and your firewall suites present in your smartphone, these protections can interrupt the firmware update process.
Note: – This post is only for the educational purpose. So if, anything happens to your device we are not responsible for that. Follow carefully all the instructions mention in this tutorial, all changes you’ll make on your device is only your own risk.
How to Root Galaxy Note 2 N7100 Android Phone:
- First, download the Rooting Package for Galaxy Note 2 N7100 device.
- Download Odin from here to your PC, and running the Odin app.
- Extract the archives on your computer.
- Now turn off your smartphone to can be entered in Download Mode.
- Enter in Download Mode by pressing the Volume up button and Power button both on the same time while the phone is turned off.
- Connect your Samsung Galaxy Note 2 with the original USB cables with your PC.
- Now the Odin app should see that: ID: COM section will turn Yellow indicating. That means all the drivers are installed successfully.
- Click on “PDA” button to select “cwm6-root-note2.tar.md5”, after you have selected the mentioned file, click “START” button.
The latest step is to verify if your device is rooted or not, for make this, please use the “Root Checker” app, application which you can download from the Google play Store.
Note: If your smartphone doesn’t boot up or refused to appear the Home screen, the you should press the power button a long time, to turn off your device and follow the tutorial from the begin.
Saturday, October 25, 2014
Nokia 3720C Mic mouthpiece microphone repair solution

before trying to replace a new DigiMic microphone first try to trace the line paths od digimic supply voltage and the DigiMic clock and then the corresponding chip resistors that is mounted near to it, the three resistors has a resistance value of 100 ohms each.
Nokia 1800 and Nokia 1616 Earpiece and Ringer Speaker Solution
The below solution picture shows the line paths and layout of components for the Earpiece Speaker.You may trace all of those corresponding components if having trouble with the earpiece or Earpiece Audio sound problem. The positive and negative audio signal which flow across into four coils, a chip resistor 4.6 ohms and an EMI filter chip before it being feeds to the Speaker terminal pads and so on to the speaker.

The two remaining components are chip resistors, this resistors are fusible resistors with has a zero ohms value. Both positive and negative Audio signals also flow into the two filter coils and the emi filter chip then feeds trough to the speaker.

All those components are very easy to check and you may find a replacement on it if found busted or damaged. If all of its corresponding components were already replace and making sure that all of it working perfectly okay but the problem still exists and no audio sound can be heard over the speaker, we may now consider that the problem lies on the line paths between the main IC or the IC itself is being damaged. connections.

Just be careful and have a good heat temperature and air flow control using you reworking station in handling the main IC module.
Friday, October 24, 2014
Blackberry 9900 cellular phone mic repair solution

Thursday, October 23, 2014
How to update verizon Galaxy nexus to android 4 1 jelly bean officially
How to Get Android 4.1 Jelly Bean official for Verizon Galaxy Nexus right now
An advantage when you do your update is to be connected to a Wi-Fi network, probably the ones who will try to do updates over cellular will not succeed.
Blackberry 9700 Cellular Phone Sim card Not Working Repair Solution

In above diagram red color line is identifying an IC that is used in sim function.After dis assembly of blackberry 9700 check this IC and its near by area.
If you found some rust carbon or water damages then it can also be cause of blackberry 9700 insert sim problem to solve and fix insert sim problem in blackberry 9700 clean all the rust and carbon with electronics cleaner and apply hot air to make it dry.
Re sold or Re flow this Ic and if resolding can not solve insert sim problem in blackberry 9700 then replace this IC.
for more detail and new tips and tricks about cellphone service problem keep visiting this page we will update cellphone service diagrams timely with new cellphone diagrams.some related post are also given bellow you can read them also for more information about blackberry cellular phone.
How to root Kindle fire HD
This method is confirmed for Fire HD 7, but you have to go on all new versions that are based on ICS.
- Download
adb shell
rm -r /data/local/tmp
ln -s /data/ /data/local/tmp
exit
adb reboot
adb shell
echo ‘ro.kernel.qemu=1′ > /data/local.prop
exit
abd reboot
adb shell mount -o remount,rw /system
adb push su /system/xbin/su
adb shell
chown 0.0 /system/xbin/su
chmod 06755 /system/xbin/su
rm /data/local.prop
exit
adb reboot
adb install Superuser.apk
Blackberry 8520 vusd jumper Solution

I Phone 5 Full Ways Details See this 100 Working Way

Blackberry 9105 cellular phone mmc not work repair solution

Wednesday, October 22, 2014
Nokia X3 Hands Free Ringer speaker No audio Sounds Solution

Saturday, October 18, 2014
Nokia 105 display light jumper solution without transister
nokia 105 display light problam,nokia 105 lcd light jumper, 105 display light jumper, nokia 105 display light solution, nokia 105 light problem, nokia 105 light solution jumper, nokia 105 lcd laihgt prablam, 105 lcd light solution, nokia 105 solution, nokia105displaylight, nokia 105 lcd light problem solution, nokia 105 display light problem, nokia display light 105 solution, nokia 105 lcd jumper, 105 light
Nokia 2330 Classic speaker ear piece problem solution jumper ways
In above diagram you can see red and blue lines.These lines are tracks and paths that are used in speaker function in Nokia 2330 Classic. So check all these parts with meter and if any of them is missing apply jumper.You can apply jumper at points that are shown in diagram for repairing speaker problem solution.
for more detail and new tips and tricks about cellphone service problem keep visiting this page we will update cellphone service diagrams timely with new cellphone diagrams.some related post are also given bellow you can read them also for more information about cellphone.
Nokia C5 06 Voluem Keypad Lock keys not working Solution

After dis assemble of Nokia C5-06 look at mother board and If you found some rust carbon or water damages then it can also be cause of Nokia C5-06 keys problem to solve and fix keys problem in Nokia C5-06 clean all the rust and carbon with electronics cleaner and apply hot air to make it dry.
In above diagram you can see some different color lines. These lines are tracks and paths of keys button switch that are used for keypad lock and voluem of keys button switch.
Check all these tracks with meter and apply jumpers. If these key switches are not working then you can replace voluem and keypad lock buttons.
for more detail and new tips and tricks about cellphone service problem keep visiting this page we will update cellphone service diagrams timely with new cellphone diagrams.some related post are also given bellow you can read them also for more information about cellphone.
Friday, October 17, 2014
Nokia E55 E52 Mic ways Not Working

Nokia E55/E52 Mic Problem
Nokia E55/E52 Mic Line Trac
Nokia E55/E52 Mic Not Working
Nokia X2 02 Lcd Display Jumper Ways Problem Solution

After disassambly of Nokia X2-02 look at the motherboard for rust carbon or burren parts. If you found some rust or carbon apply electronics cleaner on the mother board and apply hot air to make it dry proper.
Applying too much heat can damage the mother board and parts.It also can be harm for your skin.So keep in mind about normal heat flow when making it dry.
Remove old LCD and Check it with new one. In above diagram you can see some different color lines that are pointing to the parts which are used in Display function of Nokia X2-02.
Check all these parts with help of meter and apply jumpers as shown in above diagram to solve display problem in Nokia X2-02.
If you find some broken and missing components then apply jumper on points where small circles given in nokia lcd problem solution.
Nokia X2 02 Mic problem solution Microphone not working

If mic is not working or have a low voice it can be fault of mic and housing. Check Nokia X2-02 housing ( body ). All housing have a small whole at the point of mic. In some cases rust or dust cover this point and the voice can not reach proper to the mic point so make it clean if there is some dust on it.
After disassambly of Nokia X2-02 look at the motherboard for rust carbon or burren parts. If you found some rust or carbon apply electronics cleaner on the mother board and apply hot air to make it dry proper.
Applying too much heat can damage the mother board and parts.It also can be harm for your skin.So keep in mind about normal heat flow when making it dry.
Remove mic and check all these tracks that are provided in above diagram to solve mic problem in Nokia X2-02. In diagram two different color lines are given to identify all parts that are used to solve Nokia X2-02 mic problem with jumpers.
If some parts are missing or damage apply jumper on these points where small circles are pointing in nokia mic repairing diagram above.
Thursday, October 16, 2014
Nokia X2 05 Not Charging Problem Solution Jumper Ways
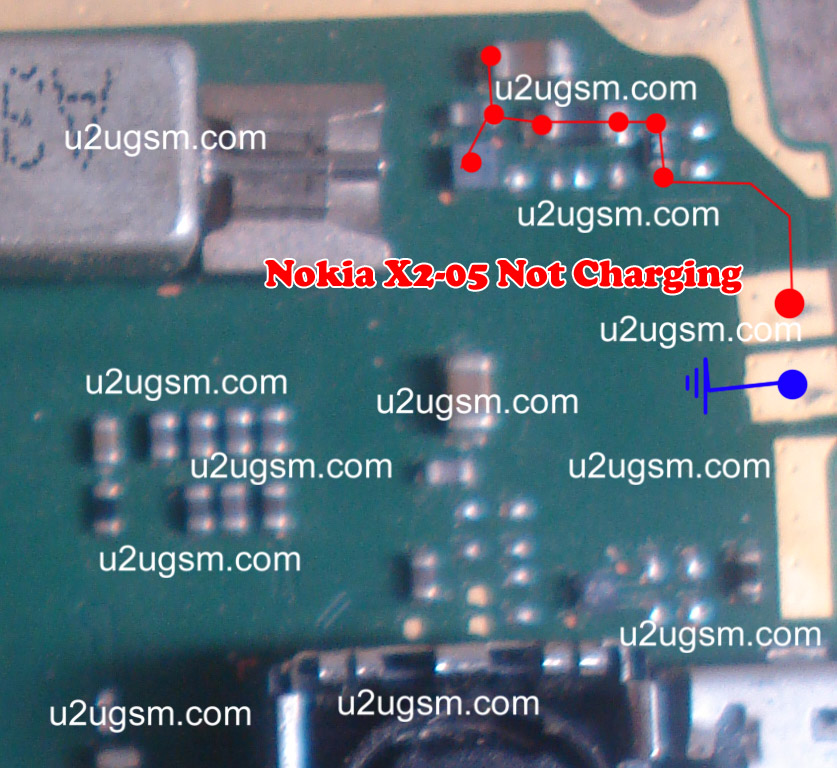
If notification on the Lcd of Nokia X2-05 will be about charger not supported it can be problem of charger not supported. And if notification displays about not charging. It can be the problem of water damages of may be due to in proper values of parts that are used in charging function of Nokia X2-05.
After disassambly of Nokia X2-05 look at the motherboard for rust carbon or burren parts. If you found some rust or carbon apply electronics cleaner on the mother board and apply hot air to make it dry proper.
Applying too much heat can damage the mother board and parts.It also can be harm for your skin.So keep in mind about normal heat flow when making it dry.
In above diagram a red line bar is used to identify parts and ways that are used in solution of not charging in Nokia X2-05. Once you track these parts with meter apply jumpers if any of them is missing, damage or giving un proper values. Whlie the blue line is used for negative point of the charging base.
6100 Insert Sim Problem

6100 Sim Problem,
6100 Sim jacket Ways,
6100 Sim Ways,
6100 Insert Sim Solution,
6100 Sim Jacket Tracks
Wednesday, October 15, 2014
Dual Sim IC Repair Dual Sim IC Ways and Jumper 03


Dual Sim IC Repair Dual Sim IC Ways and Jumper 03
Nokia X2 00 Not charging solution
nokia x2-00 charger not supported
nokia x2-00 charging not supported solution
nokia x2 charger not supported solution
nokia x2-05 charger not supported
x2-00 charger not supported
nokia x2-00 charging not supported
nokia x2 00 charger not supported
x2-00 charger not supported solution
x2-00 charging not supported
nokia x200 charger not supported
this resistance is used in all nokia mobile phones with same 47k value so you can use it from any of nokia mobile just position of resistance can be different in each mobile.
Sony Ericson Full Jumper
K500 / K508
RSI- K700,K500
Alien battery or Capacity Problem COMPONENT PLACING - handfree new -
K300 / K500 / K700 key joy - K500 / k300 / k700 Handsfree problems -
[COLOR=White]K500 K700 network problem 1800 or 900 - k500 keypad ic bypass - K500
keypad - K500 sim - K500i joystick - K500i keypad solution - K500 ant
switch - K500 / K508 / F500 display schematics - K500 Knatte chip - K500
led lcd K500 microphone - K500 microphone comp layout - K500 nosim -
K300 / K500 / K700 sim problem - SonyEric K500 / k700 audio1
K550
K550 keys - K500 mic - K550 mic2 - K550 charge ways - K550 MIC JUMPER -
K600 / K60x Test Point and disassembling manual v2 - K600 power switch
schematics - K600 system conector - K600 joystick repair - K600i key
and joystik ways - K600 key board and joystik
K610
K610
V630 / K610 handfree mode - K610 charging - K610 mic - K610 sim1 - K610
sim2 - K610 hands free - K610i Micways - K610i LCD - K610i / V630i sim
ways - K610 mic ways - K610 sim - T610 new on off ways
K700
F700 F500 not charg - 700 camera.rar - K300 mic hand free copy - K700
back light - K700 antenna switch - K700 lcd - K700 Modify light - K700
auto on off - K700 component placing - K700 hangat menu - K700i hang
solution - K700i joystick - K700 microfon - K700 joystick - K700 mic -
S700charge - K700I repair light lcd - Sys conector K700 - T230 LCD
light not working
K750
750 volume key - 1 2 3 left
software key - K750 Camera - K750 keypad - K750 / W800 / W700 light -
K750 charging - K750 joystick - K750 Lsd licht - K750 / W800 hang -
K750 Bluetooth problem - K750 charing problem - K750contrast - K750I
Display & Keyboard - K750I Display & Keyboard 2 - K750i key pad
jumper - K750i 4 IN 1 cable modify with Auto Power - K750i charging -
K750I sim way - K750 Joy jumper - K750 keyped problem - K750 LCD light
- K750 LCD way repair - K750mic - K750 on off and iluminations - K750
white Lcd - k750 camera - K750 charging - K750 joy schematics - K750
/ W800 repair microphone - K750 mmc - Label Info - N2980 comp placing -
Part List.rar - repair LED LCD K750 / W800
Trouble Shooting Guide
W700I Mic way - K750 camera - K790 - Joystic ways K790 - K790 not power
on - K790 - K790 lcd keypad light schematic - K790 joystick component -
K790 joystick schematic - K790 / K800 Joystick Way - K790 white display
K800
K790 / K800 Joystick Way - K800 charging problem - K800 IC Missing -
K800 key ways - K800 primary side - K800 secondary side - K800 speaker
- K800 illumination - K800i keypad - K800 joystick way - K800 keyboard
ways - K800 lcd light - K800 knop - K750 sim way
M600 speaker
P800
P800 charging - P800 charging2 - P800 signal problem - P800 no charging
- P800 LCD Connector - P800 LCD DC Converter part - P800 / N560 LCD DC
Driver Layout - P990 / P910 - mic P900 - P900 lcd ways - P900 mic -
P900 speaker ways - P910 / P900 charge ways - P900 / 910 not charging -
P990 - P990 mic ways - P990 charging way - P990 ring ear
T20
T20 self charge - T68 / T65.rar / T68 Buzzer - T68 Earphone - T68
Joystick - T68 joystick connections - T68 lcd - T68 lights - T68 lights
2 - T100 ericsson - T100 solution signal - T10x antena switch -
solution low signal T100 - T100 keypad - T100 audio - T100 ringer
T100 not charging
Download
Tuesday, October 14, 2014

NOKIA 5233 Not Charging solution no response problem solution
Nokia 5233 volume up down not working solution

for more detail and new tips and tricks about cellphone service problem keep visiting this page we will update cellphone service diagrams timely with new cellphone diagrams.some related post are also given bellow you can read them also for more information about cellphone.

Monday, October 13, 2014

Thursday, October 2, 2014
Pantech Renue Resetting Instructions
Pantech Renue Resetting Instructions - The Pantech Renue was announced last year ( 2012, July). The phone powered by Qualcomm QSC 6270 chipset and it has 3.2 inches TFT capacitive touchscreen. The phone equipped with 3.15 MP camera and work on under GSM / HSDPA network. If you are owner of this phone and need information or instructions about how to resetting the Pantech Renue, you can read the tutorial below:
Resetting the phone guide:
- First, Tap Menu > Settings > Reset
- Then, Enter password > OK > Master Reset
- Further, Tap Yes
Note : If you want return configuration settings to default. The Pantech Renue default password is ‘1234’.
Clearing the phone guide:
- As usual, first you must Tap Menu > Settings > Reset
- And then, Enter password > OK > Master Clear
- Next step, Tap Yes
Note It will return the settings to default and erase all personal data. The default password is ‘1234’. If you see the Low battery message, please connect your phone to the Micro USB charger adaptor before resetting or clearing the phone.
ASUS P565 Hard Reset Restore Default Factory Settings
This instructions or tutorial for owner of Asus P565 especially about hard reset guide or about how to restore default / factory settings in the Asus P565 phone. Ok, before you do it, there are some that need attention:
The first, backup your important data into memory external before restoring to the default settings. Then dont forget always remove the microSD card from the device before restoring your phone.
Follow this instructions to ASUS P565 default factory settings:
First, press and hold UP key
Then press RESET at same time. Press Call key to confirm, End key to cancel
This option allows you to restore the device system to its default factory settings.
To restore default settings:
1. Tap > Settings > System tab > Default Settings.
2. Enter 1234 in the Password field and tap OK to confirm that you want to restore to default settings.
3. Tap Yes to start restoring
Google Nexus 10 Hard Reset Guide and Recovery Mode
We have two important information for your tablet. The first about the Google Nexus 10 Hard Reset Guide and tutorial how to recovery mode.
Google Nexus 10 Hard Reset Guide:
If you want to hard reset with your tablet, follow this instructions:
Select Settings
Back up and reset
Factory data reset
Reset tablet
Delete all
Or if older firmware, follow this instructions:
From the Home screen, press the Menu Key and touch Settings
Then, touch the Privacy
Further, touch Factory data reset
And then touch Reset tablet
Touch Erase everything
How to Recovery Mode for Google Nexus 10:
The first, must turn off in your Google Nexus Tablet.
Then press and hold Volume UP+DOWN+POWER buttons.
Next step, plug in to your computer the tablet to get into the recovery mode.
Further, select Wipe data Factory reset.
The last, choose YES to confirm
Warning: All data will be lost!
Wednesday, October 1, 2014
Nokia 113 Rm 871 Latest version 3 24 Flash Files Free Download
Nokia Mobile 113 Rm 871 Latest Flash Files Mcu Ppm Cnt Free Download
Samsung Galaxy Victory Tips and Tricks
Resetting your Samsung Galaxy Victory will restore the default settings of your device. It will also delete all your files on your phone, so it is recommended to backup all your important files on your computer.
Luckily in Samsung Galaxy Victory you can backup your data through your phone on settings before wiping all the data on your phone. But if you want to erase all the content on your phone, then there’s no need for you to backup your data.
How to Backup and Restore:
The phone can be configured to back up your current settings, application data, and settings.
1. Go to Settings, and select Backup and Reset.
2. Then, tap Back up my data to create a backup of your current phone settings and
applications.
3. To assign the account being backed up, tap on Backup account.
4. If you want to be assisted in the re-installation of a previously installed application, tap on Automatic restore.
How to Factory Reset:
From this menu you can reset your phone and sound settings to the factory default settings.
1. Go to Settings, and select Backup and Reset.
2. Then tap on Factory data reset.
3. Read carefully the information on the Lcd before resetting.
4. If you want to proceed in resetting your device, then tap Reset device to confirm.
5. If you have set your password, then enter your password and tap Delete all. The phone resets to the factory default settings automatically and when finished displays the Home Lcd.
• Turn on the power-saving option on the device. Then lessen the Lcd brightness and the Lcd lock timeout. Go to Settings > Power saving.
Choose which option you preferred:
CPU power saving.
Screen power saving.
Learn about power saving.
• Turn down your device volume with the volume keys.
• Close any apps or features when you are done using it so they will not continuously running in the background.
• Turn off the network connection if you are out of range so that your device will stop searching for a network signal.
• Turn off the automatic sync of application.
• You should use the latest version of the software update. Software updates improves some features and fixes some bugs on the previous software version.
• Turn off the camera flash.
• The camera viewfinder can be a power drain, so after youve finished taking photos, press the left arrow key.
1. On your device, press on

2. Then go to
 and tap on Settings menu.
3. After that, go to Security.
4. Tap on Screen lock and choose PIN.
5. And enter a PIN. Tap on continue to re-enter your PIN.
Take note that if you fail to type in the correct PIN after five attempts, you need to wait for 30 seconds before you can try again. If you wish to DISABLE the Screen Lock follow steps 1-3 and tap on Screen Lock. Then provide your security info and then tap on None.
If you want to activate the Text to speech output on your Galaxy Victory, follow these steps:
- Go to Settings, select Language and input.
- Then tap on Text-to-speech output and select your preferred Text-to-speech option.
- Google text-to-speech Engine. allows you to use and modify the Google text-to-speech settings. If you want to edit the settings, just tap on the Gear icon.
- Samsung TTS (Text-to-speech). allows you to use and modify the Samsung TTS settings. If you want to edit the settings, just tap on the Gear icon.
General Settings:
Speech rate - where you can adjust the rate of speech.
Listen to an example - plays a short example of TTS.
Driving mode - allows incoming calls and new notifications to be automatically
read aloud.