Showing posts with label samsung. Show all posts
Showing posts with label samsung. Show all posts
Monday, November 24, 2014
Samsung Mobile Phone Secret Codes

The next mobile code which we will discuss is the code for Samsung mobile phone. Some of the following code is useful to display the software version, testing ringtone, reset phone and so on. Please refer to the following code:
- *#06# = code to show IMEI number
- *#9999# or *#9998*9999# = code to show the software version
- *#9998*8888# = code to show hardware version
- *#9998*76# = code to show production number
- *#9998*288# or *#0288# = code to check battery status
- *#0246# or *#0377# = code to check memory status
- *#8999*638# = code to show network information
- *#9998*523# or *#0523# = code to set screen contrast
- *#8999*5646# = code to change operator logo
- *#0289# = code to test ringtone
- *#0842# = test vibrate
- *#0746# = code to show SIM Card information
- *2767*2878# = lock the phone
- *2767*3855# = code to reset memory, dont forget to remove SIM Card
- *#9998*5282# = Java Menu
- *#9998*4357# = Help Menu
Thats some code that can be used in Samsung mobile phones, may be useful.

Thursday, November 20, 2014
Samsung Galaxy Grand i9080 i9082 code

Samsung Galaxy Grand i9080 hard reset
force reset Reset the device (press and hold POWERの button for 8-10 seconds)
Unlock Galaxyの Premier using hard reset
Samsung GT-i9080 hard reset or reset Galaxy Premier: PRESS AND HOLD VOLUME UP + Home Button + Power
Turn the phone off.の
Press and hold VOLUME UP and Home(center) button
Press Power until the phone vibrateの
Wait until you see the Android logo then release all the buttons.
Select Wipe data/Factory reset with VOLUME DOWN, press Power (right hand-side)
Select YES -- delete all user data withの VOLUME DOWN and then press Power
After format, press Power again to reboot phone. (select reboot system now)
or reset i9082の
If your device is frozen and unresponsive, press and hold for 8-10 seconds. The device will reboot automatically.
If this does not solve the problem, perform a factory data reset. In Idle mode, openの the application list and select
Settings → Back up and reset→ Factory data reset → Reset device→ Delete all.
or Factory format entering Galaxy のGrand i9080 format code
Use this method to hard reset your Samsung Galaxy Grand i9080: Enter *2767*3855#. Warning! All your data including contacts, messages etc. will be lost! Copy all your necessary data/Contacts/Messages etc. to SIM or make backup to your PC のbefore full reset! Take out SIM card before full reset.
Note: If you reset your device to the factory defaults with SD card encryption setting enabled, the device will not be able to read your encrypted files. のDisable this setting before resetting the device.
Galaxy Grand i9080 firmware flash download のmode: PRESS AND HOLD VOLUME down + Home Button + Power on
unlock Galaxy Premierの, how to reset i9080, Galaxy Grand i9080 reset,
How to Easily Root Samsung Galaxy S4 With Some Easy Steps
It is one of the terminals of the year we are about to end in it has a small and quite easy section on Rooting.
This is the Samsung Galaxy S4, a phone with a zoom function behind it, which is common in Korean manufacturer of terminals and this time is paid for have superuser permissions.
Well lets talk about Rooting Samsung S4.
Another week were with you and exposing what steps to take greater control of your phone with Android and this time we are talking about a very special device. S4 by Samsung comes one of the most popular phone, not in vain is as worthy as the Samsung Galaxy S III. So today well discover the secrets to root a Samsung S4.
The importance of the root is highlighted in Samsung Cellulars, such as the community is all about the Korean manufacturer, which makes this generally with a greater number of ROM. Process is Exynos 5420.
The steps are very simple and have no problems though, as we always say, any action undertaken is done at your own risk and from Rooting take no responsibility for problems that may arise. Grab a Samsung S4 and prepare to begin!!.
Requirements:
Install Kies for the drivers.
Restart your phone for the changes to take effect.
Download and install Odin or a latest version!
Download the CF-Root from Chainfire
Steps To Root Samsung Galaxy S4:
Just download and install Kies, the software owned by Samsung, is only necessary if our phone does not have installed the drivers from the phone. If you already have loaded we can skip this first step.
Once installed open Odin, but attentive to do it using administrator permissions. In case anyone does not know it is done with the right button on Odin icon and selecting "Run as administrator".
Once we started Odin, looking box called PDA . The activate and seek the menu and load the file CF-Root from Chainfire that we have previously downloaded.
We turn off the phone and started mode Download using the key combination volume down, center and power button at the same time and when we ask with a yellow triangle press volume up.
We connect the Samsung Galaxy S4 to PC and wait for Odin to recognize it. This should change the box to the top left, ID below.
COM, a yellow or blue color depending of the version of Odin we use if not recognized may not have properly installed the drivers , so we reload.
Press the option Start and expect the process to finish . We will see a series of messages in the lower left part of the evolution process, which ends when the box in the top left changes to green with the words PASS .
In that time we have managed to have permissions root and we can switch off the mobile PC .
As you can see the process is very simple, and although as always, there is minimal risk , almost all steps are automated and the hardest can be often charging of drivers , as Odin is a program with a large stability makes the terminal simpler Samsung rooting?
Wednesday, November 19, 2014
Samsung Wave525 S5253 Insert Sim Solution Ways

Samsung Wave525 S5253 Insert Sim Solution Ways
Sunday, November 16, 2014
Repair Samsung C3303 Champ Auto Charging Problem Solution

Repair Samsung C3303 Champ Auto Charging Problem Solution
Repair Samsung C3303 Champ Auto Charging Problem
Repair Samsung C3303 Champ Not Charging Problem
Repair Samsung C3303 Champ Auto Charging Problem By Jumpers
Samsung Galaxy S 4G No Display LCD Solutions
The highlighted components holds for the LCD screen of the Galaxy S 4G to operate properly, if those said components become faulty or damaged it will result to a display problem issues. You may need to check those components if after or before changing the LCD screen module. 
Samsung Galaxy S 4G No Display LCD Solutions
Samsung Galaxy S 4G No Display LCD Problem
Samsung Galaxy S 4G No Display LCD Jumper Ways
Read More..
Samsung Galaxy S 4G No Display LCD Problem
Samsung Galaxy S 4G No Display LCD Jumper Ways
Thursday, November 13, 2014

Tuesday, November 11, 2014
Hard Reset Samsung Galaxy Ace s5830
How To Hard Reset Your Samsung Galaxy Gt-s5830
* Switch Off Your Samsung Galaxy Ace Gt-s5830
* Take Out Your Sim And Memmory Card
* Press And Hold Home Key + Then Power On Your Phone
* Hold Pressing Keys Untill The Second Logo Appears
* When Scond Logo . Release All Keys
* Then You Will Get Factory Reset Menu
* Select Wipe Data/ Factory Reset Option . Scroll Using Volume Key . Then Confirm
* By Select Yes Delete All User Data Using Volume Down Key . confirm.
* Wait Some Seconds. Then Select Reboot System Now Option And Confirm
* Now Your Phone Will Restarted. After Completing The Hard Reset Proses
* Done !
Read More..
* Switch Off Your Samsung Galaxy Ace Gt-s5830
* Take Out Your Sim And Memmory Card
* Press And Hold Home Key + Then Power On Your Phone
* Hold Pressing Keys Untill The Second Logo Appears
* When Scond Logo . Release All Keys
* Then You Will Get Factory Reset Menu
* Select Wipe Data/ Factory Reset Option . Scroll Using Volume Key . Then Confirm
* By Select Yes Delete All User Data Using Volume Down Key . confirm.
* Wait Some Seconds. Then Select Reboot System Now Option And Confirm
* Now Your Phone Will Restarted. After Completing The Hard Reset Proses
* Done !
Sunday, October 26, 2014
How to Root samsung Galaxy Note 2 N7100

The pre requisites you will have to follow this guide are:
- This rooting process is and work only for Samsung Galaxy Note 2 international version, model number N7100. For checking the model number follows the next path: “Settings > About Phone”.
- After the device is rooted you’ll lose the warranty for your device, for get back your warranty is to re applying with the official firmware update, firmware that you currently have it.
- For saving your SMS, please use “SMS Backup & Restore app”.
- For saving your Contacts, please use “Sync with the Gmail application”.
- For saving your stored Call Log, please use Call Log and Restore.
- For saving your Images files, Songs and Videos files, and other important Files please Copy to internal / External SD Card.
- For APN and MMS Settings, you can note down from the path “Applications > Settings > Wireless and Network > Mobile Networks > Access Point Names”
We recommend turning off your antivirus protection and your firewall suites present in your smartphone, these protections can interrupt the firmware update process.
Note: – This post is only for the educational purpose. So if, anything happens to your device we are not responsible for that. Follow carefully all the instructions mention in this tutorial, all changes you’ll make on your device is only your own risk.
How to Root Galaxy Note 2 N7100 Android Phone:
- First, download the Rooting Package for Galaxy Note 2 N7100 device.
- Download Odin from here to your PC, and running the Odin app.
- Extract the archives on your computer.
- Now turn off your smartphone to can be entered in Download Mode.
- Enter in Download Mode by pressing the Volume up button and Power button both on the same time while the phone is turned off.
- Connect your Samsung Galaxy Note 2 with the original USB cables with your PC.
- Now the Odin app should see that: ID: COM section will turn Yellow indicating. That means all the drivers are installed successfully.
- Click on “PDA” button to select “cwm6-root-note2.tar.md5”, after you have selected the mentioned file, click “START” button.
The latest step is to verify if your device is rooted or not, for make this, please use the “Root Checker” app, application which you can download from the Google play Store.
Note: If your smartphone doesn’t boot up or refused to appear the Home screen, the you should press the power button a long time, to turn off your device and follow the tutorial from the begin.
Wednesday, October 1, 2014
Samsung Galaxy Victory Tips and Tricks
How to Backup and Factory Reset Samsung Galaxy Victory
Resetting your Samsung Galaxy Victory will restore the default settings of your device. It will also delete all your files on your phone, so it is recommended to backup all your important files on your computer.
Luckily in Samsung Galaxy Victory you can backup your data through your phone on settings before wiping all the data on your phone. But if you want to erase all the content on your phone, then there’s no need for you to backup your data.
How to Backup and Restore:
The phone can be configured to back up your current settings, application data, and settings.
1. Go to Settings, and select Backup and Reset.
2. Then, tap Back up my data to create a backup of your current phone settings and
applications.
3. To assign the account being backed up, tap on Backup account.
4. If you want to be assisted in the re-installation of a previously installed application, tap on Automatic restore.
How to Factory Reset:
From this menu you can reset your phone and sound settings to the factory default settings.
1. Go to Settings, and select Backup and Reset.
2. Then tap on Factory data reset.
3. Read carefully the information on the Lcd before resetting.
4. If you want to proceed in resetting your device, then tap Reset device to confirm.
5. If you have set your password, then enter your password and tap Delete all. The phone resets to the factory default settings automatically and when finished displays the Home Lcd.
How to Extend Battery Life of Samsung Galaxy Victory
How to Use Screen Unlock PIN on Samsung Galaxy Victory
How to Use a Text to Speech Output on Samsung Galaxy Victory
Read More..
Resetting your Samsung Galaxy Victory will restore the default settings of your device. It will also delete all your files on your phone, so it is recommended to backup all your important files on your computer.
Luckily in Samsung Galaxy Victory you can backup your data through your phone on settings before wiping all the data on your phone. But if you want to erase all the content on your phone, then there’s no need for you to backup your data.
How to Backup and Restore:
The phone can be configured to back up your current settings, application data, and settings.
1. Go to Settings, and select Backup and Reset.
2. Then, tap Back up my data to create a backup of your current phone settings and
applications.
3. To assign the account being backed up, tap on Backup account.
4. If you want to be assisted in the re-installation of a previously installed application, tap on Automatic restore.
How to Factory Reset:
From this menu you can reset your phone and sound settings to the factory default settings.
1. Go to Settings, and select Backup and Reset.
2. Then tap on Factory data reset.
3. Read carefully the information on the Lcd before resetting.
4. If you want to proceed in resetting your device, then tap Reset device to confirm.
5. If you have set your password, then enter your password and tap Delete all. The phone resets to the factory default settings automatically and when finished displays the Home Lcd.
Battery Life depends on how you use your device. For Samsung Galaxy Victory device, if you want to save your battery to last longer hours, you may need to adjust your settings. Follow these suggestions:
• Turn on the power-saving option on the device. Then lessen the Lcd brightness and the Lcd lock timeout. Go to Settings > Power saving.
Choose which option you preferred:
CPU power saving.
Screen power saving.
Learn about power saving.
• Turn down your device volume with the volume keys.
• Close any apps or features when you are done using it so they will not continuously running in the background.
• Turn off the network connection if you are out of range so that your device will stop searching for a network signal.
• Turn off the automatic sync of application.
• You should use the latest version of the software update. Software updates improves some features and fixes some bugs on the previous software version.
• Turn off the camera flash.
• The camera viewfinder can be a power drain, so after youve finished taking photos, press the left arrow key.
• Turn on the power-saving option on the device. Then lessen the Lcd brightness and the Lcd lock timeout. Go to Settings > Power saving.
Choose which option you preferred:
CPU power saving.
Screen power saving.
Learn about power saving.
• Turn down your device volume with the volume keys.
• Close any apps or features when you are done using it so they will not continuously running in the background.
• Turn off the network connection if you are out of range so that your device will stop searching for a network signal.
• Turn off the automatic sync of application.
• You should use the latest version of the software update. Software updates improves some features and fixes some bugs on the previous software version.
• Turn off the camera flash.
• The camera viewfinder can be a power drain, so after youve finished taking photos, press the left arrow key.
Securing your phone from unwanted users is sort of mandatory these days. If you have important files or private photos/videos you only want to keep to yourself, then its time for you to activate a Lcd unlock PIN/pattern. For those who own a Samsung Galaxy Victory phone, heres how to use a Lcd unlock PIN feature.
1. On your device, press on
2. Then go to and tap on Settings menu.
3. After that, go to Security.
4. Tap on Screen lock and choose PIN.
5. And enter a PIN. Tap on continue to re-enter your PIN.
Take note that if you fail to type in the correct PIN after five attempts, you need to wait for 30 seconds before you can try again. If you wish to DISABLE the Screen Lock follow steps 1-3 and tap on Screen Lock. Then provide your security info and then tap on None.
1. On your device, press on
2. Then go to
and tap on Settings menu.3. After that, go to Security.
4. Tap on Screen lock and choose PIN.
5. And enter a PIN. Tap on continue to re-enter your PIN.
Take note that if you fail to type in the correct PIN after five attempts, you need to wait for 30 seconds before you can try again. If you wish to DISABLE the Screen Lock follow steps 1-3 and tap on Screen Lock. Then provide your security info and then tap on None.
In case you dont know what is the Text-to-speech output, it is the feature that allows your phone to provide a verbal readout of on-Lcd data. For example, a message or incoming caller information (based on Caller ID).
If you want to activate the Text to speech output on your Galaxy Victory, follow these steps:
- Google text-to-speech Engine. allows you to use and modify the Google text-to-speech settings. If you want to edit the settings, just tap on the Gear icon.
- Samsung TTS (Text-to-speech). allows you to use and modify the Samsung TTS settings. If you want to edit the settings, just tap on the Gear icon.
General Settings:
Speech rate - where you can adjust the rate of speech.
Listen to an example - plays a short example of TTS.
Driving mode - allows incoming calls and new notifications to be automatically
read aloud.
If you want to activate the Text to speech output on your Galaxy Victory, follow these steps:
- Go to Settings, select Language and input.
- Then tap on Text-to-speech output and select your preferred Text-to-speech option.
- Google text-to-speech Engine. allows you to use and modify the Google text-to-speech settings. If you want to edit the settings, just tap on the Gear icon.
- Samsung TTS (Text-to-speech). allows you to use and modify the Samsung TTS settings. If you want to edit the settings, just tap on the Gear icon.
General Settings:
Speech rate - where you can adjust the rate of speech.
Listen to an example - plays a short example of TTS.
Driving mode - allows incoming calls and new notifications to be automatically
read aloud.
Thursday, September 25, 2014
Samsung i9003 Camera Not Working fix problem

Samsung i9003 Camera Not Working How to Fix problem,Samsung i9003 Camera Not Open Working How to Fix problem,Samsung i9003 Camera Open Then Hang Not Working How to Fix problem,Samsung i9003 Camera Error Not Working How to Fix problem,Samsung i9003 Camera No Working Properly How to Fix problem,Samsung i9003 Camera Not Working Open To Restart How to Fix problem,Samsung i9003 Camera Not Working Show Only Blue Screen How to Fix problem.
Just Work Step By Step i Hope Working Again Your Handset Camera .Tnxx To Visit My Blog Again Plzz Share This Post If You Tested .
Tuesday, September 23, 2014
Samsung E251 Ear Speaker Ways Solution

Monday, September 22, 2014
How to enter Samsung Galaxy S4 Recovery Mode
Android Recovery Mode is a hidden menu of your Samsung Galaxy S4 smartphone. It is a great tool that can be used to wipe data, factory reset, format system partition, install kernels, install new ROM and tons of other things that should allow you to improve your smartphone and its current OS.
The Recovery mode can be stock or custom. The Stock Recovery Mode is the first and original variant that comes packed with the smartphone after you purchase it. It works with stock and rooted phone, while it won’t work with Galaxy S4 devices that are running on custom ROMs.
A Custom Recovery mode is installed after you root the phone. Two of the most popular custom recoveries for Samsung Galaxy S4 are the ClockworkMod – CWM and the TWRP – Team Win Recovery Project ones. Both are very similar in functions and will do the exact same things. You can learn how to boot your Samsung Galaxy S4 into Recovery mode using this post.
This guide works with any variant of Samsung Galaxy S4 Snapdragon 600 variant such as AT&T, T-Mobile, Sprint, US Cellular, Verizon etc. Also, it works with the Exynos 5 Octa version of Galaxy S4. Booting into Recovery Mode is easy and you can do it in the same way for both stock and custom Recoveries.
Note: If your smartphone is rooted or running a custom ROM, then you should that it is possible for you to boot into Custom Recovery mode directly from your Galaxy S4 Power options menu or using an app downloaded from Google Play Store.
If you Samsung Galaxy S4 is rooted, then you can easily boot into Recovery using ROM Manager (here) or GooManager (here) applications.
Simply launch the apps on your Galaxy S4 phone and then select the ‘Reboot Recovery’ option. Wait several moments for the device to verify root access and then the Custom Recovery Mode will load successfully.
If your Samsung Galaxy S4 is running a custom ROM such as CM 10.1 or ParanoidAndroid, then you can boot into CWM / TWRP Recovery without powering off the device. Press and hold Power button until a menu is shown on your smartphone’s menu. You will need to select ‘Reboot’ and then ‘Recovery’ option. Wait for the phone to boot into custom Recovery mode.
Use the custom Recovery for ROM installation, factory resets, wipe cache, wipe dalvik cache, create system backups, mount partitions, adb sideload etc. The stock Recovery is much more limited but you can still apply factory reset and wipe cache. These were all the instructions that you had to go over and learn how to boot your Samsung Galaxy into Recovery Mode.
If you have any other questions, use the comments section listed below.
Read More..
The Recovery mode can be stock or custom. The Stock Recovery Mode is the first and original variant that comes packed with the smartphone after you purchase it. It works with stock and rooted phone, while it won’t work with Galaxy S4 devices that are running on custom ROMs.
A Custom Recovery mode is installed after you root the phone. Two of the most popular custom recoveries for Samsung Galaxy S4 are the ClockworkMod – CWM and the TWRP – Team Win Recovery Project ones. Both are very similar in functions and will do the exact same things. You can learn how to boot your Samsung Galaxy S4 into Recovery mode using this post.
This guide works with any variant of Samsung Galaxy S4 Snapdragon 600 variant such as AT&T, T-Mobile, Sprint, US Cellular, Verizon etc. Also, it works with the Exynos 5 Octa version of Galaxy S4. Booting into Recovery Mode is easy and you can do it in the same way for both stock and custom Recoveries.
Here’s how to boot your Samsung Galaxy S4 into Stock / CWM / TWRP Recovery Mode:
- Power off your device completely.
- Press and hold Volume Up, Home and Power buttons simultaneously.
- Release the buttons when the phone’s Lcd flickers or the Stock / CWM / TWRP Recovery logo appears.
- That is it, after you release buttons, you will be taken to the main Recovery Mode menu.
- Use its settings to apply any tasks you wish in order to improve your Galaxy S4 operating system.
- To reboot back to normal Galaxy S4 mode, you need to return to the first Recovery Lcd and select ‘reboot system’.
Note: If your smartphone is rooted or running a custom ROM, then you should that it is possible for you to boot into Custom Recovery mode directly from your Galaxy S4 Power options menu or using an app downloaded from Google Play Store.
If you Samsung Galaxy S4 is rooted, then you can easily boot into Recovery using ROM Manager (here) or GooManager (here) applications.
Simply launch the apps on your Galaxy S4 phone and then select the ‘Reboot Recovery’ option. Wait several moments for the device to verify root access and then the Custom Recovery Mode will load successfully.
If your Samsung Galaxy S4 is running a custom ROM such as CM 10.1 or ParanoidAndroid, then you can boot into CWM / TWRP Recovery without powering off the device. Press and hold Power button until a menu is shown on your smartphone’s menu. You will need to select ‘Reboot’ and then ‘Recovery’ option. Wait for the phone to boot into custom Recovery mode.
Use the custom Recovery for ROM installation, factory resets, wipe cache, wipe dalvik cache, create system backups, mount partitions, adb sideload etc. The stock Recovery is much more limited but you can still apply factory reset and wipe cache. These were all the instructions that you had to go over and learn how to boot your Samsung Galaxy into Recovery Mode.
If you have any other questions, use the comments section listed below.
Sunday, September 21, 2014
Samsung C3010 factory reset
Warning! All data will be lost!
Power on your phone.
Just type *2767*3855#
Wait until phone restarts.
Saturday, September 20, 2014
Samsung Galaxy Young Duos S6312 hard reset

Samsung Galaxy Young S6312 data:
GSM frequencies :850 900 1800 1900
Standard UMTS :900 2100
Type :Touch
Dimensions (W x H x D) :109,40 x 58,60 x 12,50 mm
Weight :112,00 g
Main display :Color / TFT
320 x 480 px (3.27") 176 ppi
Standard battery :Li-Ion 1300 mAh
Internal memory :4 GB
RAM memory :768 MB
Memory cards : microSD, microSDHC, microSDXC (up to 64 GB)
Operating system :Android 4.1 Jelly Bean
Processor clock :1,00 GHz
TouchLcd : yes
DualSIM : yes
How to hard reset:
If you forgot your Lcd lock combination or password follow these steps.
Warning! All data will be lost!
1.Press together volume up + home button + power button
2.Release your fingers of the phone when Samsung logo appear
3.Choose with volume buttons "wipe data/factory reset" and select it with power button
4.Choose "yes" with volume buttons and select it with power button
5.Wait untiil format is complete
6.Select "reboot"
7.Wait until the phone restarts
Thats it!
Here is video how to do:
Install Pre Rooted Android 4 2 2 XXUAMC6 Jelly Bean firmware for the Samsung Galaxy S4 I9500
This guide contains all the instructions that you need to follow in order to install a pre-rooted Android 4.2.2 XXUAMC6 firmware on your Galaxy S4 I9500. It is an experimental release and we’re not sure that it works. This root appeared on XDA and it seems to be the first root file that you can flash on Samsung’s latest flagship device.
The Galaxy S4 will be launched at the end of this post but, an XDA member and developer, that goes by the name of AS I9000, managed to use the system dump files of Android 4.2.2 XXUAMCH firmware and create a new system.img file with added root and busybox. All these changes are included in a single .tar.md5 file and you can use to root the SGS4.
This root file doesn’t contain any Kernels, Recoveries nor Modem. It is stock Android 4.2.2 XXUAMC6 pre-rooted and busyboxed Jelly Bean firmware.In order to make sure that you successfully root your device using this guide, then you should first read the preparation info below:
Note that this is only a pre-rooted firmware and highly experimental. You might find some errors and bugs with this release or, it might not even work for some devices. We will know more after the Galaxy S4 will be officially released this late April.
Read More..
The Galaxy S4 will be launched at the end of this post but, an XDA member and developer, that goes by the name of AS I9000, managed to use the system dump files of Android 4.2.2 XXUAMCH firmware and create a new system.img file with added root and busybox. All these changes are included in a single .tar.md5 file and you can use to root the SGS4.
This root file doesn’t contain any Kernels, Recoveries nor Modem. It is stock Android 4.2.2 XXUAMC6 pre-rooted and busyboxed Jelly Bean firmware.In order to make sure that you successfully root your device using this guide, then you should first read the preparation info below:
- The tutorial will work only with the Samsung Galaxy S4 model number I9500. It is the Exynos 5 Octa (eight-core) CPU variant of Galaxy S4. Don’t use this guide with the I9505 model as you will brick it.
- Your Windows computer should have the Samsung USB drivers installed on it.
- Try and backup all the data that’s currently stored on your device.
- Enable USB Debugging option from the Developer Options menu. If you can’t find this menu, then you should open Settings, then ‘About phone’ section, scroll down to ‘Build Number’ and tap this 7 times. You will be told that ‘now you’re a developer’ or something like that.
- Make sure that your computer doesn’t have any antivirus applications running in background. You’ll use the ODIN app to install this rooted firmware file and an antivirus app might consider ODIN to be malware. Note that it is a perfectly safe-to-use program.
- The battery power left level should be over 40% before starting the root process. This will prevent the device from switching off.
- Use this tutorial only if you’re an advanced user and you wish to test new rooted Android 4.2.2 releases on your Galaxy S4. Do not blame us in case you brick the phone or you lose any data files in the process.
- Read all the instructions listed below and make sure that you won’t skip any steps.
How to install rooted Android 4.2.2 XXUAMC6 Jelly Bean for the Samsung Galaxy S4 I9500:
- Download the XXUAMC6 I9500 Rooted zip from HERE. Save the file on your PC and, when download is complete, extract its contents. You will get a file that has the ‘.tar’ or ‘.tar.md5′ extension.
- Download Odin 1.85 from HERE. Extract its contents on your PC. NOTE: If Odin 1.85 fails to install the root, then you might want to try Odin 3.04 (here) or Odin 3.07 (here).
- Power off your Galaxy S4 device.
- Boot it into Download Mode by pressing and holding simultaneously Volume Down and Power buttons. When the Lcd powers ON you will need to press ‘Power’ once again for the Android Download Mode to appear. Get to the next step.
- Launch Odin exe on your PC.
- Now, connect your Galaxy S4 to your PC via USB data cable. Odin should say ‘added!!’ when the phone’s drivers have been successfully installed.
- Next, click the ‘PDA’ button in ODIN. Browse your PC contents for the I9500XXUAMC6_I9500OXAAMC6_ROOT_ODEX.tar.md5 file. Load it into ODIN. Don’t change any default settings of ODIN, just make sure that the ‘Re-partition’ option is disabled.
- Press the ‘START’ button when you’re ready for the installation. ODIN will take several minutes to complete the firmware flash process.
- When the install is complete you will see that the phone has restarted and ODIN displays the ‘Pass’ message. You can unplug the phone from PC now.
- The phone will reboot now and the last thing you need to do, is to check for the Superuser icon in the App drawer. If it appears, the root is now complete.
Note that this is only a pre-rooted firmware and highly experimental. You might find some errors and bugs with this release or, it might not even work for some devices. We will know more after the Galaxy S4 will be officially released this late April.
Friday, September 19, 2014
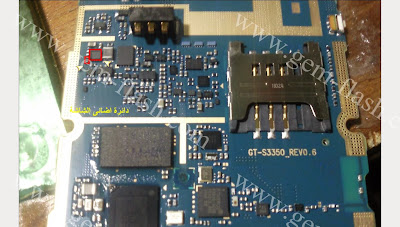
Samsung S3350 Ch t 335 Cellular Phone Lcd Light Not Working fix problem

Thursday, September 18, 2014
Samsung s5230 touchpad not working solution
if u already try to change touchpad glass then u have to remove these parts...ur prob,ll 100% solved..

Wednesday, September 17, 2014

Subscribe to:
Posts (Atom)
